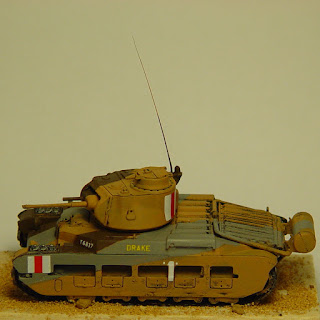
Matilda (1/72 Airfix)
Building the Matilda Airfix kit caused quite a bit of brief.
To begin with, Airfix really needs to check their quality control - flash is a major problem, with difficult curved pieces like the turret and hatches needing to be trimmed before assembly. The fit's pretty bad as well: the top hull wouldn't meet the bottom hull when assembled - I eventually filled in the gap with some putty.
Then there's the fact that the Matilda has all these damned bogey wheels on the side sandwiched between two pieces of hull, requiring more dexterity than my clumsy fingers could manage - trying to sandwich 14 small pieces of plastic between two larger ones, each one having to fit into a specific and (in the case of Airfix) often poorly moulded hole, all the while with glue squishing all over your fingers and time running out as the glue begins to set is not fun.
Another problem which cropped up was the vinyl tracks snapping. This was a surprise to me. I usually do a basecoat of black, paint on the main colour, and then assemble the tracks, but this time I decided to assemble everything before spraying on the base coat. Right after I did that, the tracks snapped at the rear, at the point of greatest curve (and presumably greatest stress). I suspect that the spray paint may have something to do with it - either a chemical reaction, or something to do with temperature change (sudden cold from the spray paint?) Either way, I'm not going to find out a second time, as it already took me good half hour to repair the damage - I had to cut up the vinyl tracks into smaller pieces and stick them on to match the curve.
After that, painting on the camouflage scheme was easy. One of things that attracted me to building this model was the chance to paint a caunter camouflage scheme, which consists of bright contrasting colours (here sand, brown, and grey) in abstract shapes, designed to break up the outline of the tank and make it less recognisable. One challenge was weathering the model: I usually use a lighter shade of the main colour, but for this tank, I tried to use lighter shades of all three main colours on the appropriate parts. It didn't work as well as I expected, and I may go back and just apply a general weathering over the entire tank.
The real problems began when I started applying the decals though. Small, fiddly decals and my clumsy fingers do not a good combination make. I tend to tear them, drop them, lose them. You see the decal that says "Drake"? (the British gave each tank in a squadron names starting with the same letter, in this case "D") Well, I almost had a tank called "Rake".
But the biggest "oh shit" moment came when I realised that one of the licence plate decals went in an inaccesible spot at the back of the tank. This was when I put everything down, spent a good 5 minutes cursing and swearing, and wondering why I hadn't read the assembly instructions better. It then took me half an hour to manuever the decal in place.
All in all, an enlightening experience. I've got the Fujimi version of this tank as well, which looks to slightly more challenging - double the number of pieces for the bogey wheels! Oh whoopee.


Comments
Post a Comment